Scenery — Structures and Buildings
Based on this track plan,
>
I've decided to use some of the structures/features. I've listed the revised list below.
Crosby's Coal, Freight Depot (Design Preservation Models), Engine House, Water Tank (Atlas), Houses, Schultz's Garage (Design Preservation Models), Kelly's Saloon (Design Preservation Models), J.C. Landry Feed and Supply (Walthers), Loading Dock, Wally's Warehouse (Walthers), undecided, Barn
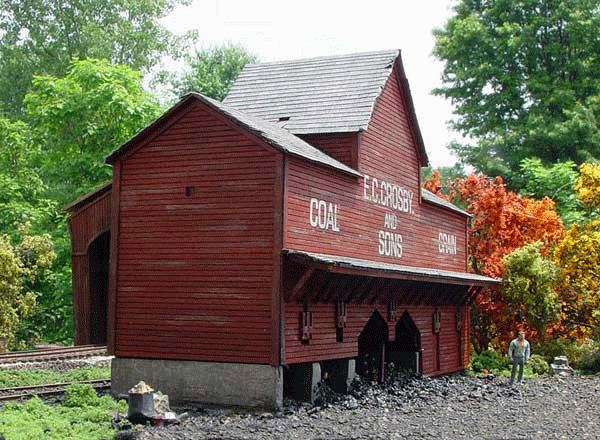
Crosby's Coal
A lasercut wood kit.

With the main building assembled (just resting on the resin base). It is much easier to paint these as you go instead of when it's complete.

And with the first pieces of trim in place. Note that the colors used are Citadel Codex Gray for the main building (with a Citadel Fortress Gray drybrush), and Grimy Black on the trim Pieces. The instructions noted that despite the building being currently red, old photo's show it in a lighter color. I chose Gray instead of Red as there is a Barn on this end of the table, and the engine house will also be Red.

The rest of the trim in place, I began working on the roof. Note that I painted the edges of underlayment black just incase the shingles didn't cover everything perfectly.
The shingles are not quite individually applied, they come in long strips that are. you can see a couple of left over pieces in in the bottom of the picture

Here's an end shot of the completed lower roof. For scheduling purposes, you're looking at about an hour and a half to get this part finished. You can see on the uper roof my method, which is to hang the shingles out ver the edge, and than cut it flush with a sharp blade. The shingles were supposed to be, according to the instructions, self sticking, but mine were not. Just as well, as I simply brushed on white glue (full strength) and laid down the shingle strip. The glue gives you some play to straighten the strips that the self adhesive will not.
I think it's a great looking roof.

The roof, paint, and decals are finished. Now it just needs to be based, and weathered.

I had some issues with the decals; I'm not unhappy with the results even if they could be a bit more centered. Word of advice to anyone making this model, cut out the center words individually to reduce the decal film area.
I realized after I built the kit there is no "office", this is just the bulk material storage building. I've ordered a small office structure to go with it, I'll scenic the area once I have that foot print on hand.

The back side

I decided that Crosby's Coal was missing something, so I added this yard office from BTS (Better than Scratch)

It turned out to be a bit smaller than I had wanted, but it was a fun little kit to put together.

The only part missing is the smoke jack.

I had enough left over shingles from the Crosby kit, that I was able to roof the office in the same materials, and save the shingles that came with this for something else.
Freight Depot (Design Preservation Models)
A plastic kit.

The DPM depot is also ready for painting; I used plastruct molded plastic shingles, and added the roof supports.


The freight depot is finished from a painting standpoint, but is not going to stay here. Crosby's Coal is destined for this spot.

The two of them after painting. Both still need a "grimy black" wash.
Engine House
A lasercut wood kit.
Water Tank (Atlas)
A plastic kit.
Houses
Plastic kits
Schultz's Garage (Design Preservation Models)
A plastic kit.

Kelly's Saloon (Design Preservation Models)
A plastic kit.


This DPM kit, Kelly's Saloon, is ready for primer.

I broke one of the two sided chimney's while assembling it, so decided to rework the roof instead. The roof surface is 150 grit sand paper, I added two vent stacks, as well a a chimney and roof hatch.

I really need to come back an paint that middle building to get the plastic sheen off.
J.C. Landry Feed and Supply (Walthers)
A plastic "snap" together kit.


J.C. Landry Feed and Supply(left) and Wally's Warehouse (right) from the Walther's Gold Ribbon Series. These were super fast to assemble, as things just snap in place. The kits also come with a ton of detailing supplies, none of which are in place currently. Both buildings are simply held together without glue, meaning I can go back and repaint/weather them in sections. For now, I'm simply playing with their placement.

The back sides. I'm missed the fact that Wally's didn't' have it's own loading dock like J.C. Landry's, so I'll have to pick up another one before the building gets a final placement.
Loading Dock
A laser cut wood product.

This kit was self described as "tedious". And it was, but it was a good learning experience for me with a lasercut kit.

The kit had a few forms, such as the bottom ones glued to the yard stick that hold the legs in place. The upper spacer form was not easy to use, but it did work to keep the ribs in place.

Once finished, it does look good.

And with the top in place, as well as a scratch built ramp. The ramp needs a little tweaking.


I painted the loading dock with Citadel fortress gray, very watered down.


Wally's Warehouse (Walthers)
A plastic "snap" together kit.


That's Citadel's Bubonic Brown as a wash on the siding of Wally's Warehouse, and Poly Scale Dark Green for the trim.

It already looks much better.
Undecided
Dairy Barn (Northeastern Scale Models)
A lasercut wood kit


The Barn has been painted, and trimmed, but still needs basing and a roof. The fence was made with left over laser cut boards from the loading dock (see above), and toothpicks.

